Showing posts with label Faith In God. Show all posts

TUTORIAL: Scrabble Tile Pendants

This tutorial is for those who want to make an instant masterpiece with a large group.
*
We made scrabble tile pendant necklaces recently during our Stake Beehive Conference. It was a perfect "quick and easy" craft for our group of 80+ girls and leaders.
*
SUPPLIES
  • Scrabble Tiles
  • Resin Drop Stickers (I purchased mine from Dew Supplies on Etsy)
  • Mod Podge
  • Super Glue
  • Small Jewelry Bails
  • Ball Chains
PREPARATION
To help save on time, I put together "kits" for each young woman. That way they could simply grab a kit and go to work. I placed the following items into a snack sized ziplock bag: instuctions, scrabble tile, bail, ball chain, and resin sticker. The Mod Podge, and super glue were placed at their work space - along with some baby wipes for their fingers. :)
*
*
This is how we made ours:
  1. Carefully remove the protective backing from the resin sticker, do not touch the sticky side.
  2. Press over the image you want to use.
  3. Trim down the image, cutting right up along the edge of the sticker.
  4. Using your finger, spread a layer of Mod Podge over the entire backside of the scrabble tile (make sure to spread all the way to the sides). Center on the non-letter side of your Scrabble tile (make sure the back letter is facing upwards) and press into place. Press and hold the image on top of the Scrabble tile for several minutes to create a tight bond. Let dry fully for at least 15 minutes.
  5. Flip your Scrabble tile over so the back is facing you. Using Super Glue, carefully center your bail along the top edge of your tile and press into place. Let dry. It'll be quick!
  6. Thread ball chain, using the end without the clasp, through bail. Secure the clasp.
  7. All done!
IMAGES
*
Create your own images for your own unique creations. Here is a sample of the images we used for our Beehive Conference:
*


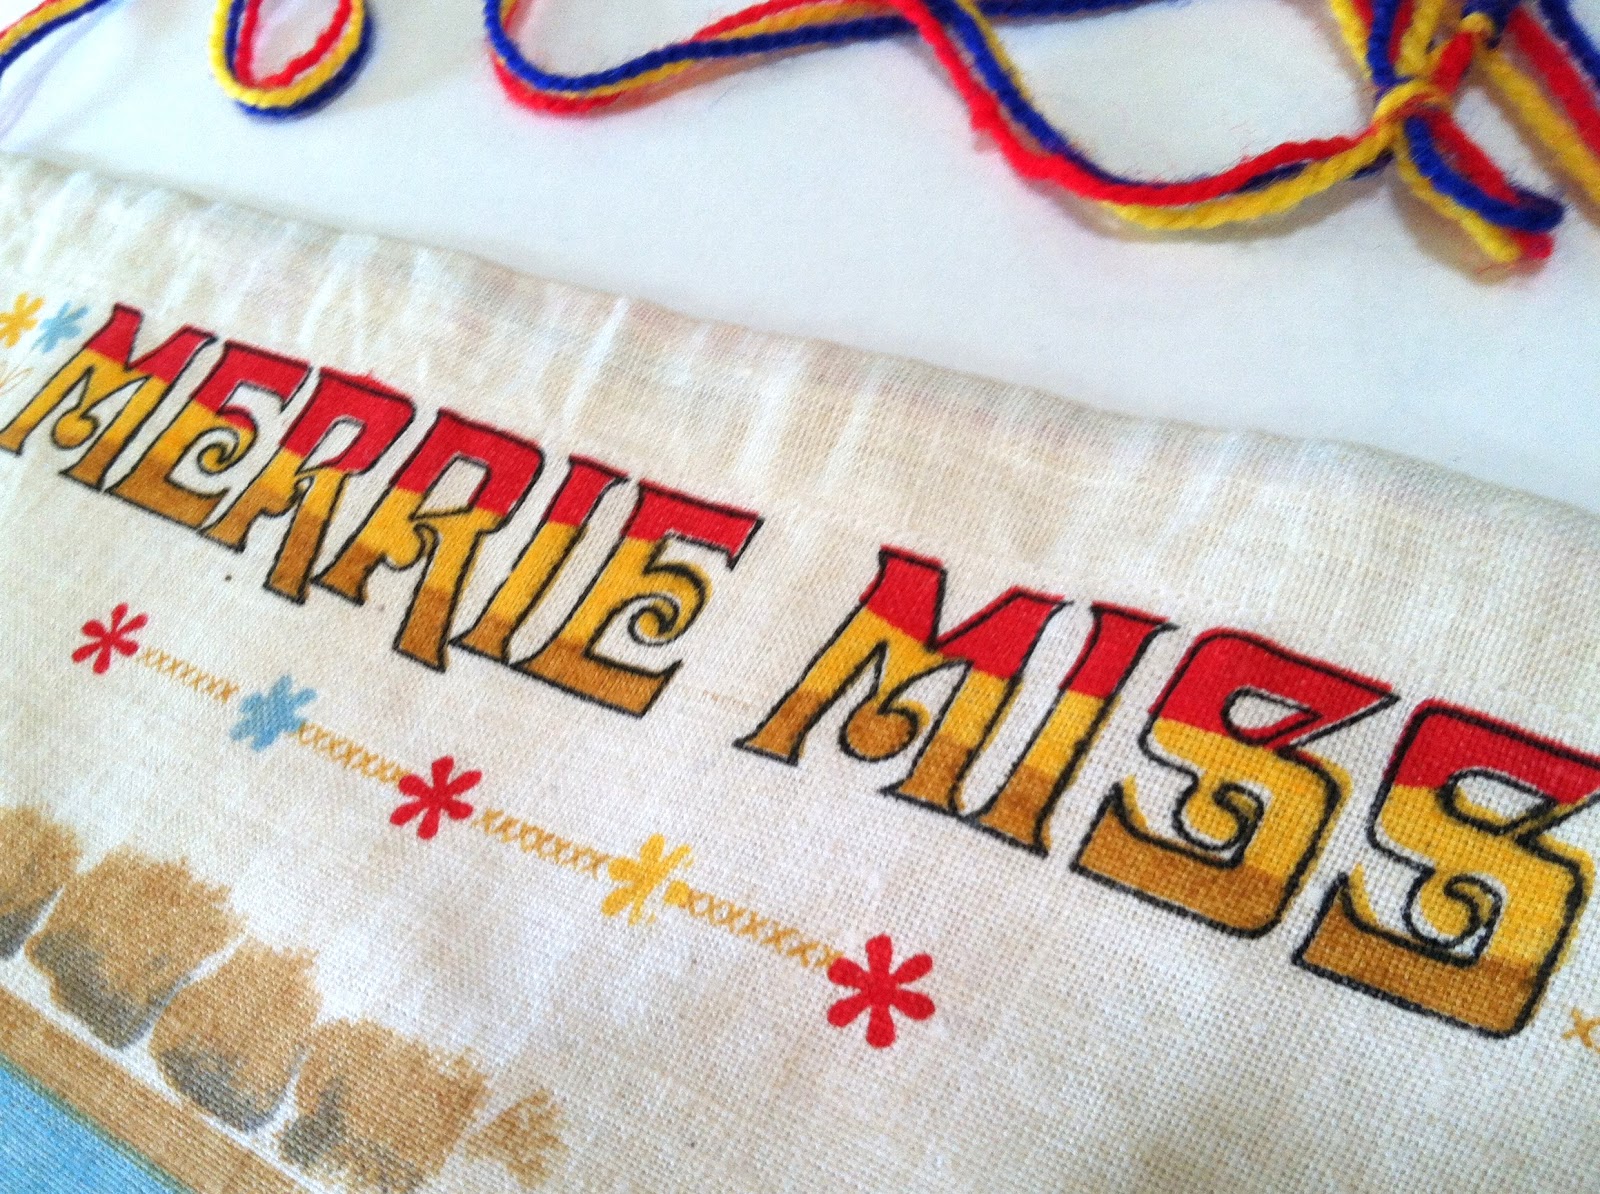
Merrie Miss

How many of you are old enough to remember this? Another treasure I came across, while going through boxes... my Merrie Miss Banner.
*
*
As you can see, I seem to be missing a few of the bronze stickers. I will have to keep searching through boxes. I am positive I had earned them all. :)
*
*
We used yarn to hand stitch the phrase, "I will radiate the light of the gospel". I totally recall doing this! I love when my memory comes back to me. :) Didn't I do a fabulous job?
*
*
We received one of these awesome sticker backed emblems (olden day version of bottle caps, don't you think?) for each Article of Faith memorized.
*
*
I believe we were supposed to place our own photo here. I would have been 10-11 years old when I was working on this banner.
*
I remember my teacher, Sister Collins. She was beautiful inside and out - I am sure she still is. :) She had a carved wooden jewlery box (as I recall) that she would bring to class each Sunday. It held a suprise for each of us in the class. I don't ever remember the box holding candy. It held hand lotions (sample size) and lip balms. It was the best thing ever! So girly and so grown up.
*
I also remember a class over nighter we had at her house. I can picture all of us there in her home and remembering that it was so much fun!
*
So many fun memories escaping the files tucked away in my mind.

With Me, In Every Step

This is an inspirational classic:
*
MINI DEVOTIONAL/THOUGHT
Footsteps in the Sand, written by Mary Stevenson
*
Main Thought: “He is with you, every step of the way.”
____________________
*
One night I had a dream--
I dreamed I was walking along the beach with the Lord
and across the sky flashed scenes from my life.
For each scene I noticed two sets of footprints,
one belonged to me and the other to the Lord.

*
*
When the last scene of my life flashed before me,
I looked back at the footprints in the sand.
I noticed that many times along the path of my life,
there was only one set of footprints.
I also noticed that it happened at the very lowest
and saddest times in my life.
This really bothered me and I questioned the Lord about it.
"Lord, you said that once I decided to follow you,
you would walk with me all the way,
but I have noticed that during the most troublesome times in my life
there is only one set of footprints.
"I don't understand why in times when I needed you most,
you should leave me."
*
Prince of Peace, by Liz Lemon Swindle 
*
The Lord replied, "My precious, precious child,
I love you and I would never, never leave you
during your times of trial and suffering.
"When you saw only one set of footprints,
it was then that I carried you."
*
written by Mary Stevenson
____________________
*CRAFT ideas - Footprint Inspired
*
Sand Cast Plaster Footprints
Capturing footprints doesn't have to be reserved for babies and toddlers.
A tub of sand, plaster of Paris, water, a stick (to stir), and I'm sure a few giggles.
After a 30 minute wait, the girls would have a wonderful personal reminder of His love.
tutorial here, from Noah's Art
*
Footprint Art
This would be a fun project for the girls.
Great for display.
Have them each create a footprint, maybe with those things they have been blessed with.
idea found here
*
Footprint Pendant
These were crafted in fine silver.
Why couldn't the girls create a miniature footprint
in salt dough and spray paint them silver?
purchase personalized pendants here, from KLMcDesigns
*
Candle Art
I would add miniature seashells in place of the flowers and add a sandy base.
You could emphasize that the candle represents the light of Christ in their lives.
idea found here
*
Wooden Photo Block 3.5 x 5 x .75 Footprints in the sand
Wooden Photo Block
A simple block of wood with a photograph mod podged onto it.
Quick and easy.
purchase original here, from Longshot Galleries
*
baby footprint pendant
Footprint Pendant
tutorial here, from the Artful Crafter

A Crowning Effect - DIY Headbands

These next few posts will all be ones created while gathering ideas for YW Camp.  This one is a list of various DIY Headband ideas I came across:
*
Headband from a Men's Tie
found here
*
Upcycled Bra Strap Headband
found here
*
DIY Braided Headband
found here
*
DIY Coachella Inspired Floral Headband
instructions here
*
5 Step No-Sew Lace Headband
You could also use rickrack, ribbon,
tutorial here
*
Ruffly Headband
tutorial here
*
T-Shirt Refashion - Headband
found here
*
How to Tie a Scarf into a Headband
instructions here
*

Housewife Headband
Just love the look!
*

DIY Bandana Headband
idea from Needles and Roses
*

Wired Fabric Bow Headband
fabulous tutorial here, from Kelly Hicks Design
*
IMG_6894
Braided Headbands
tutorial here, from Alisa Burke
*

Floral Headbands
tutorial here, from Frock Stock

Beginning Cross Stitch

Here is another activity I have done with the young women.  Beginning Cross Stitch.  It would also be a great activity for the activity day girls as well.
*
Honestly, this turned out much better than I thought it would.  When the girls told me they wanted to learn how to cross-stitch I thought to myself, "Cross-Stitch? Really?"  Luckily, a quick refresher course and a few supplies later...  voila!  "You girls would be so proud of me!"
*
SUPPLIES USED
  • 14 count plastic canvas, perfect for beginners
  • embroidery floss
  • 22 rounded needle
  • scissors
  • pencils
*
I went to Michael's and picked up a plastic canvas sheet for each girl.  My first thought was to purchase an embroidery hoop and fabric for each girl, but I am glad I went with the plastic.  I figured the plastic canvas would be easier to work with.  And it was.   
7-Count Colored Plastic Canvas Sheets
I admit, I needed a refresher course myself.  I found this:  Learn How To Cross Stitch In 5 minutes.  Just what I needed to get started!
*
I started by drawing a grid on the chalkboard and explaing in detail how to create a basic cross stitch.  Remember, I am a visual learner.  :)  I think that approach worked out really well.  We also went over how to thread a needle, knotting the end of the thread, and finishing a stitch.
*
There was some one-on-one instruction where needed.  But, the girls picked it up really quickly.  And we heard a number of them say "this is fun!".  :)
*
The girls used their pencils to draw a picture, a favorite quote, a design, whatever they wanted to on their sheet of plastic.  Then, using their new found knowledge, they began to stitch.
*
Here is a sample of a few different stitches (no, I did not stitch this):
*
Pinned Image
*
DID YOU KNOW?
The word 'Sampler' is derived from the Latin word 'Exemplum'. The meaning of this word being 'an example to be followed'. (You could create a great object lesson with this information, couldn't you?)  :)  Samplers are different examples of a stitches. It is generally believed that sampler stitching was carried out by young girls to encourage skills in stitching for use in later life. A sampler would probably have a variety of different stitches, and would be kept by the girl as a reference for future work. It would normally have been the particular individuals first attempt at stitching.
*
 The above sampler was done by 6 year old (yes 6),
Emily Shelton Sander, dated 1858.
*
During the 19th century, samplers became an important part of the school curriculum, young girls were encouraged to stitch to prepare themselves for their role as wives and mothers. These samplers tended to simple in their design, usually only having alphabets, numbers, their name and date, and the name of the school. The age of the stitcher ranged from as young as six up to about the age of fifteen years. The average age being eleven.
*
Creating a sampler would be a wonderful 10 hour project for the young women.  And a great addition to their hope chests.  :)  Just sayin'.
*
Here are a couple modern day samplers I found (plus a few more patterns):
*
Daisychain ABC's Crewelwork Sampler Pattern
available here for $6.00
*

found here
*
Arise and Shine Pattern
This and more LDS cross stitch patterns found here.
*

"Use it up, wear it out, make it do, or do without."
found here

Hope Chest and Testimonies

Maddy, my daughter, asked me to help her with a spiritual thought for mutual.  Her Beehive class activity for the night was going to be focused on the hope chest.  (Yea!)  Maddy said it was her idea.  (Double Yea!)
*
We started by reading a few different scriptures to see if anything we found went along with the idea of a Hope Chest.  We began focusing on 2 Nephi 31:20, "Wherefore, ye must press forward with a steadfastness in Christ, having a perfect brightness of hope, and a love of god and all men.  Wherefore, if ye shall press forward, feasting upon the word of Christ, and endure to the end, behold, thus saith the Father:  Ye shall have eternal life."
*
Maddy practiced what she was going to say - a few times.  We both, in our own minds could see the correlation, but agreed it was a stretch.  So we tried something else.
*
I am a visual learner.  If I can see it - I usually get it.  So, Maddy and I went to the whiteboard.  This is what we drew, as we talked about the correlation between a hope chest and a testimony:
*
*
A hope chest, historically, is a box where a young women collects items:  linens, dishes, a special dress, etc... - in hope/preparation for married life.  The box being portable, so she can take it with her.
*
A testimony, is a place in your heart where you continually add to it:  prayer, scripture study, service, etc... - in faith/preparation for eternal life.  A testimony is the one thing you take with you.
*
It is amazing what you can learn when you put a some thought into something.  I especially enjoyed the conversation Maddy and I had as we were brainstorming our ideas.  :)
*
As for the activity, the girls were asked to bring an item, a momento, to place into their hope chests.  When Maddy came home at the end of the night she was holding a box that her young women leaders had given her to begin her very own hope chest.
*
I love that the leaders are encouraging this! 

In the Graveyard: Games and Activities

Here are just a few games and activities for your Halloween parties. What are some of your favorites?

Supplies needed: lots and lots of toilet paper rolls!
Game play: Everyone will need a partner for this game. One will be the mummy, the other will be the wrapper. The wrappers have to wrap their mummy completely in toilet paper within the time given. The team closest to wrapping the mummy in the time given wins!

Whether you make it part of an official Halloween party or challenge another family (or more) to a game of Which Witch is Which Hunt... I promise you trick-or-treating will a bit more fun.
*
Game Play: Each team needs to have a camera or video camera and a list of Halloween characters to find while trick-or-treating. Have a meeting place and time for the judging to take place later in the evening.
*
Example list:
Witch
Superhero
Princess
Animal
Ghost
Policeman
Dracula
Cartoon Character
Doctor
Astronaut
Knight in Shining Armor
Football Player
Frankenstein
*
At the end of the night, gather 'round the television set and view or watch each other's video footage. You could always have prizes for:
1. most characters on the list found
2. most unique costume found
3. best decorated yard ... etc.
The good ol' game of O' So Gross! A guessing game, played in a darkened room.
*Read the story below to see what needs to be prepared beforehand.
*
Game Play: Have everyone sit in a circle. Pass out paper and pencils to each person. Explain the game - A story will be read. As the story is read, cups will be passed around one-by-one. As the cups are passed around everyone will FEEL what's inside - then WRITE DOWN what they think is really in the cup. Shut out the lights and start *the story:
*
Once in this town there lived a man named Brown.
Twas years ago this very night that he was murdered out of spite.
They say these are his remains:
Here is his brain, which now feels no pain.
(Pass around a cup with something like a wet squishy tomato inside it.)
Here are his eyes, still frozen with surprise.
(Pass the second cup which hold two frozen peeled grapes.)
Here is his heart. Be careful lest it start!
(Pass around a cup with a large lump of uncooked liver.)
Now we have his hair, which once was so fair!
(This cup contains a handful of corn silk or wet fur or yarn.)
Feel these drops of his blood. All the rest turned to mud.
(A cup with a little ketchup thinned with warm water.)
One hand all alone, just rotting flesh and bone.
(A damp plastic glove filled with mud or ice.)
Now touch his ear. He nevermore will hear!
(Pass around a cup holding a dried apricot.)
This is his nose. T'will never smell a rose.
(Use a soft piece of chicken bone.)
These worms are all that's left to feel. For them Brown was a lovely meal!
(Pass around a cup filled with wet, cooked spaghetti noodles.)

*
When the story comes to an end and everyone has finished writing down their guesses, turn up the lights and collect the papers. As you check their guesses, you can show everyone what was really in the cups.
Supplies: All you need is a package of index cards (or slips of paper), something to write with, and a room full of imagination.
*
Game Play: Write a line on each card that makes you think of Halloween. Then, pass around the deck of cards, face down. Have the first person choose a card. Have someone begin the story using the line on their card. They have 60 seconds (or less) until the person on their left takes the deck of cards from them. They choose a card and take the story in another another direction using the line on their card. This continues until everyone has had a chance to take a card from the deck (go around as many times as you would like). The last one to choose a card ends the story.
*
Here are some ideas:
the crystal vase was filled with blood the door opened. It was Count Dracula!
there was a ghost, rising from the grave
in the corner, lay a body. It was...
the candlelight flickered
it was a cauldron, and a skull bobbed inside
it was a giant swamp spider
the hand belonged to a wolf man!
the skeleton shook itself, and moved toward me
the casket creaked
rats scattered across the floor
from beyond the grave
the burial certificate had my name on it
it was a zombie nightmare
the severed head spoke
a ghost coughed
I tried to run, but I couldn't move!

Terrariums: A Tiny Garden Party

This is something I'm working on.  "A Tiny Garden Party".  Wanted to share.  And gather your ideas.
*
How fun would it be to host "A Tiny Garden Party" where each guest created and went home with their own Terrarium.  Beautiful little gardens of their own creation.  Small enough to sit on a side table, kitchen counter, or a dresser in their rooms.  As for containers, there are so many choices.  Anything from a 2 litter plastic bottle to a more sophisticated glass vase.
*
I would love to teach the young women how to plant their own terrariums, of course coupled with a lesson!
* 

terrarium by DoodleBirdie
**
LESSON
As I read the paragraph below, a number of different analogies came to mind.  Without spoiling your own thoughts...  what gospel centered principles come to your mind when you read this particular version of the story of how the terrarium first began?
"One hot summer day a man walking through an arid field, where all plant life was withered and dry, saw at his feet an unbroken bottle lying on its side.  Inside the bottle was lush green growth. Through wind and rain, soil and seed had drifted into the bottle; and there, protected from the elements, the seed had germinated and grown. The moisture within the bottle condensed each day and fell upon the little plants, and so they grew in their own small hothouse in the parched field."*
SUPPLIES
  • 1 or 2 small plants:    Possible plant choices for Open Terrariums -Fittonia, Ivy, Palms, Philodendron, Syngonium, Begonia, Airplant, African Violet, Aluminum Plant, Asparagus Fern, Baby Tears, and Bloodleaf.  And for Closed Terrariums - Fittonia, Palms, Philodendron, Syngonium, Begonia, Bloodleaf, Ficus, and Croton.
  • glass jar or plastic container, large enough to hold plants with room for growth
  • bag of small rocks or pebbles
  • charcoal or fired clay pellets
  • sphagnum moss
  • potting soil
  • wooden skewers or twig, to extend your reach and aid in the planting process
  • tiny plastic trinkets, to add interest
  • creativity
INSTRUCTIONS
  • Put about an inch of pebbles in the bottom of the container for drainage.
  • Add a layer of charcoal to keep odors at bay.  Note:  charcoal only works for a couple of years.  If you plan to maintain your terrarium for longer, substitute a layer of fired clay pellets.
  • Add a layer of sphagnum moss to keep the potting soil from seeping into the drainage level. (If you pack the drainage level tightly, you can skip the moss.)
  • Add an inch or two of potting soil and begin planting.
  • Top off the landscape with rocks and plastic trinkets. Spritz with water. Sit back and forget about watering for a while.
  • NOTE:  Once established, terrarium plants can go weeks or even months on a spritz or two of water. That's because the water evaporates from the plant, but remains inside the container as condensation moistens the soil.
  • Open Terrariums need only occassional watering, water lightly.
  • Closed Terrariums watering needed only when fogging on the sides stops or plants starts to wilt
*
RESOURCES

Memory Boards

Last night we had the girls make memory boards to hang in their rooms. They all turned so cute!
*
*
I spent all day trying to find the perfect material for Emmie's room but finally decided to go with the Princess theme, plus the material was sparkelly and that means alot! (I love sparkles!) I am so proud of myself it actually looks very cute in her room! I have left over material so I think my next project will be an accent pillow for her bed... Wow I sound like a little homemaker!

Glitter Up!

"Thanks Kim for introducing us to Glitter Toes!"

This is so simple and fun to do. You can do it alone, but it is much more fun when you are with your daughters, or girlfriends! Also a perfect activity for Young Women or Faith in God/Activity Days.
*
I wish I would have taken pictures while everyone was busily working on their pedicures. I did find this photo online to give you an idea of the outcome. These feet are much prettier than mine!
*
*
THE SUPPLIES
nail polish remover
cotton balls
nail polish - we asked everyone to bring a few of their favorite colors
fine glitter
small paint brush
clear top coat
sequins
tweezers
towels - to make for an easy clean up and help protect your floors :)
*
DIRECTIONS
1. First choose a nail color you like and a coordinating glitter.
*
2. Now you can paint! Start with your base coat.

3. Paint your nails with your choice of polish.
4. While paint is still wet, sprinkle glitter* all over each individual toe (or finger) to cover well. You may want to lay a piece of paper under the toes to minimize the mess and to catch the leftover glitter so you can use it again.
*
*Martha Stewart has a large set of extra fine glitter for around $20.00 at Walmart. The set has pretty much every color of glitter you would want.

5. You can brush off the excess glitter with a small paintbrush, but make sure not to brush directly on the toenail or you can mess up the paint job.
*
6. Once dry, paint a clear top coat over the glitter to help keep it contained and to add shine to the sparkle.
7. If you so desire... using tweezers, add nail sequins to the top coat before it dries. Then go ahead and add another top coat to keep it in place.
8. Now put your feet up, relax, and enjoy time with the girls while it all dries. (approximately an hour)  This is a great time to go over Personal Progress or Faith in God.